Quick answer
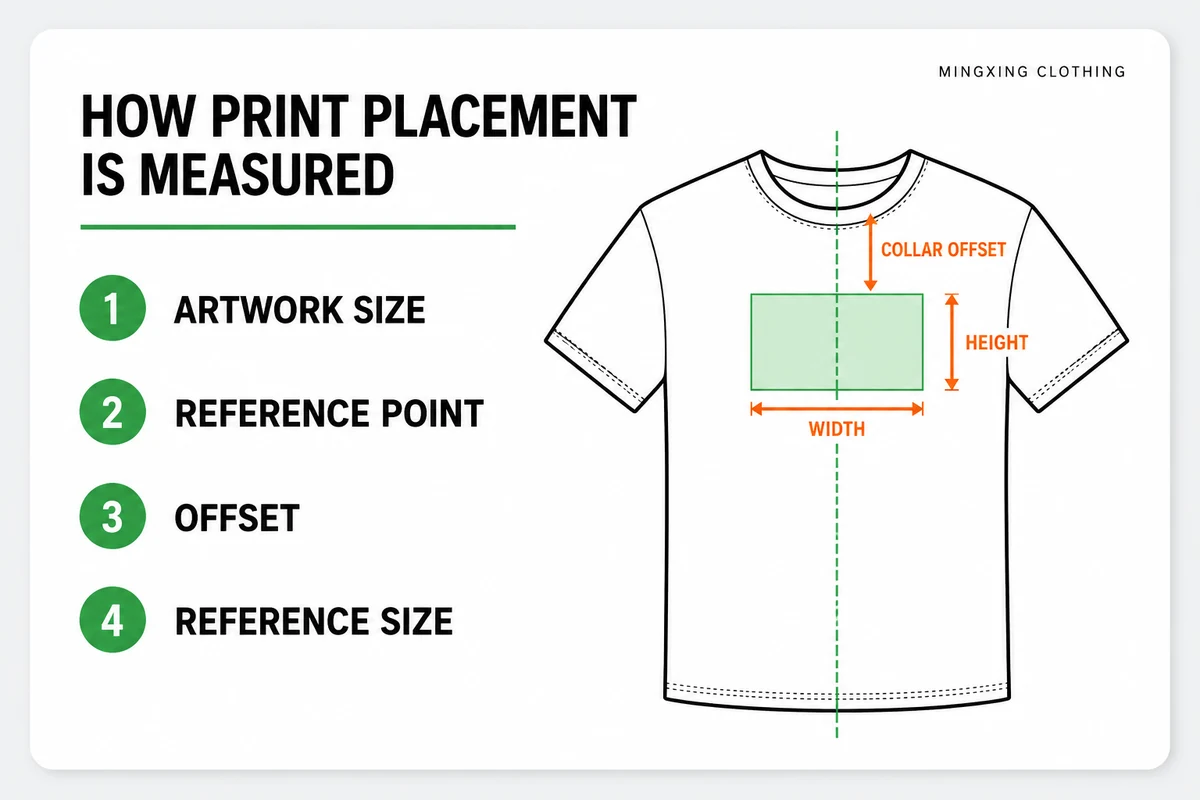
Choose a T-shirt print position by defining four things together: the artwork's finished width and height, its reference point on the garment, its distance from that point, and the garment size used for approval. Common size ranges are useful starting points, but they are not universal production standards. The shirt pattern, size range, seams, pockets, fabric, print method and artwork shape can all change the usable area.
How T-shirt print placement is specified
A placement name such as “left chest” or “full back” is not enough for sampling. Two people can interpret the same name differently. A usable print specification tells the pattern maker, sample room and print team exactly how the design should be sized and positioned.
If you are still choosing the garment itself, start with the fit, fabric and construction options on our custom printed T-shirt page. Final print approval should use the actual sample or the approved pattern, because the printable area changes with the garment.
T-shirt print placement size chart
The ranges below are practical starting points for an adult unisex reference size. They help a brand prepare a brief; they do not replace a sample. Convert the artwork to actual size, place it on the intended garment, and approve the result before bulk production.
| Placement | Starting artwork range | Position reference | Confirm on the sample |
|---|---|---|---|
| Left chest | 3–4 in / 7.5–10 cm wide | Chest area, balanced from center front and shoulder | Visual height, logo shape and distance from armhole |
| Center chest | 6–10 in / 15–25 cm wide | Centered on the garment, above the lower front area | Upper-chest position and artwork proportion |
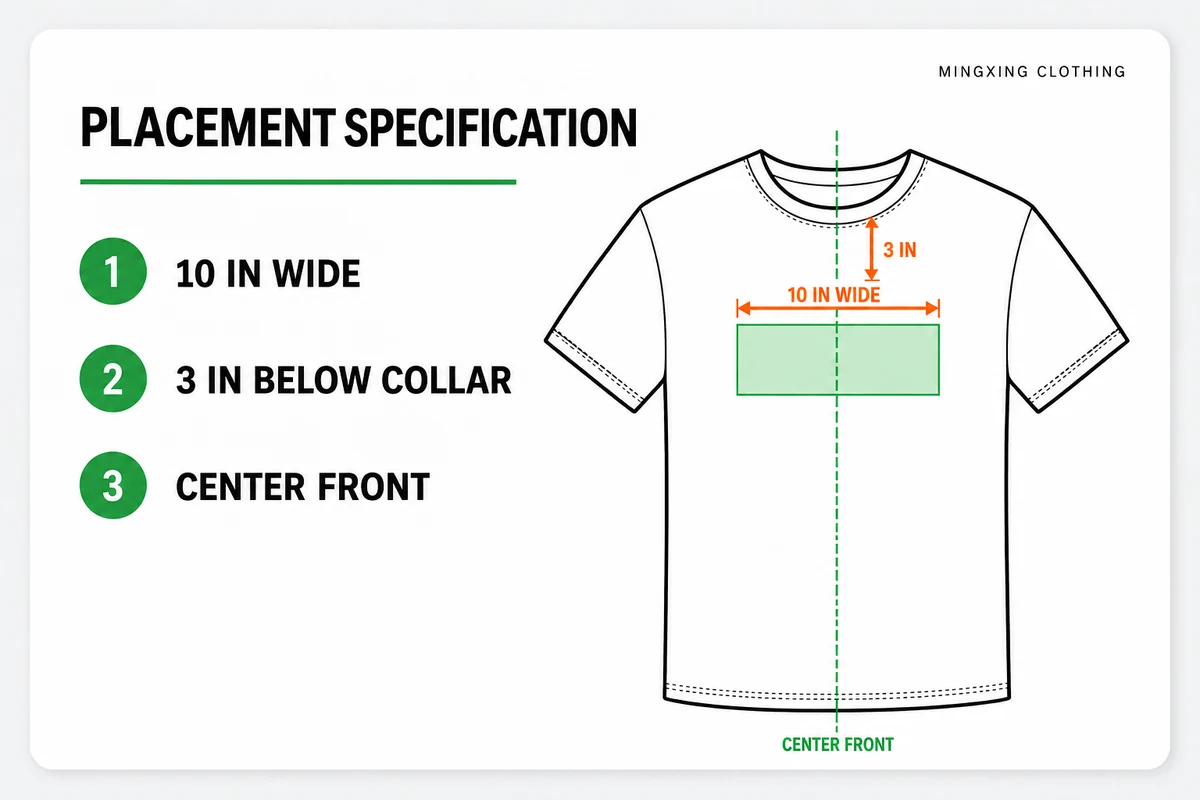
| Full front | 10–12 in / 25–30.5 cm wide | Often starts about 2.5–3.5 in / 6.5–9 cm below the collar seam | Neckline, side seams, hem and any pocket |
| Upper back | 3–5 in / 7.5–12.5 cm wide | Centered below the back collar seam | Collar clearance and whether a larger back print follows |
| Full back | 10–12 in / 25–30.5 cm wide | Often starts about 3–4 in / 7.5–10 cm below the back collar seam | Shoulder-blade position, side seams and total height |
| Short sleeve | 2.5–3.5 in / 6.5–9 cm wide | Centered within the visible sleeve panel | Sleeve seam, hem, taper and viewing angle |
| Long sleeve | 2–4 in / 5–10 cm wide; height varies | Follow a marked sleeve line from shoulder or cuff | Rotation, seam clearance and platen access |
| Pocket-size or hem | 2.5–5 in / 6.5–12.5 cm wide | Relative to the pocket, side seam or finished hem | Whether the print is applied before or after assembly |
Use ranges as a fitting-room decision, not a promise. The maximum printable area depends on the product size, print equipment, artwork and production method. Youth, women's, cropped and very oversized garments need their own review.
Front print placement: left chest, center chest and full front
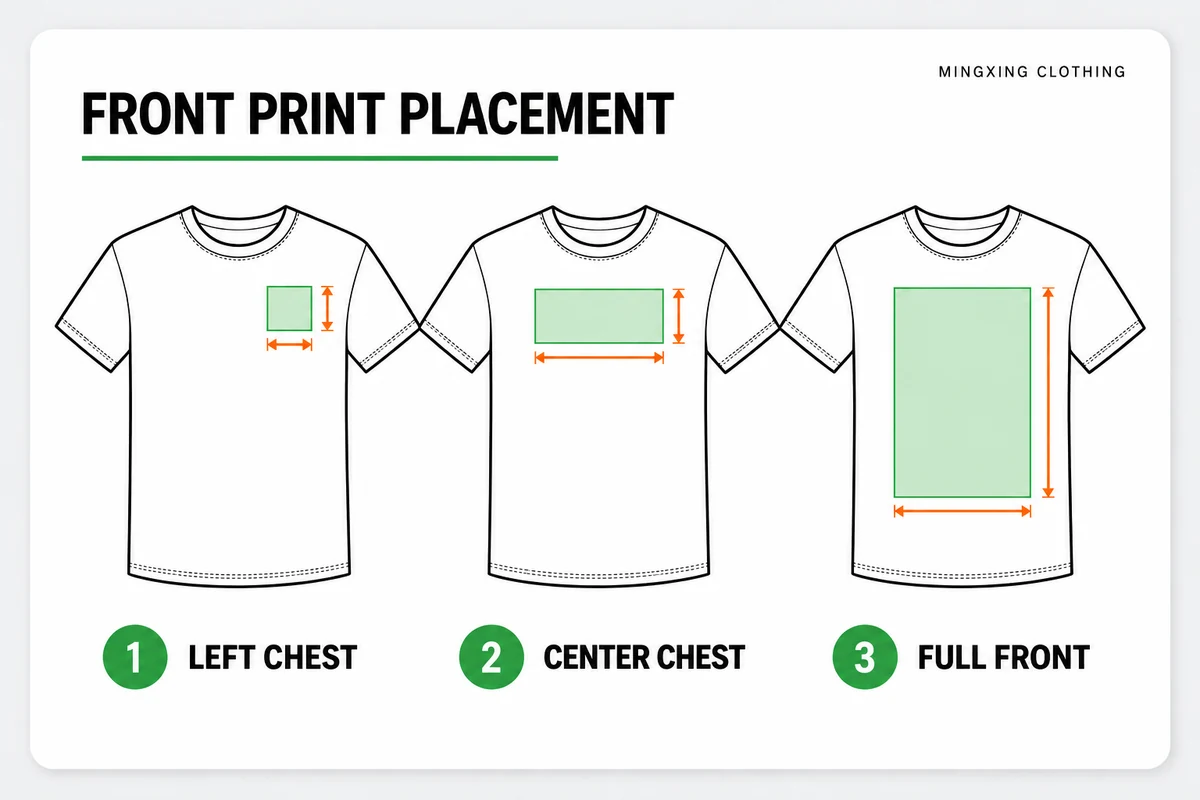
Front placement is read in relation to the neckline, center front, side seams and lower construction. Start by centering the actual garment or pattern rather than the image boundary in a product photo. Then place the artwork at its finished dimensions.
Left chest placement
A left chest logo is usually compact, but its visual position depends on the artwork shape. A wide wordmark and a square badge can share the same width while appearing at different heights. Align the visible design, not an empty digital canvas. Confirm the distance from center front and from the upper chest on the sample.
Center chest placement
Center chest sits higher and is normally smaller than a full-front graphic. It works well for a short wordmark, compact illustration or mid-size logo. Check that the top of the design does not crowd the collar and that the lower edge does not make the print look like a full-front graphic placed too high.
Full-front placement
A full-front design needs enough clearance from the collar, armholes, side seams and hem. The available height may also be limited by a chest pocket, cut-and-sew panel, zipper or other construction. On a women's, cropped or youth style, do not assume the adult unisex artwork will fit without adjustment.
Back print placement: upper back, full back and shoulder area
Back artwork is commonly referenced from the back collar seam and the center-back line. The visual top edge matters more than the top of a transparent file. If the garment has a dropped shoulder, yoke seam or shaped back panel, mark those lines in the placement artwork.
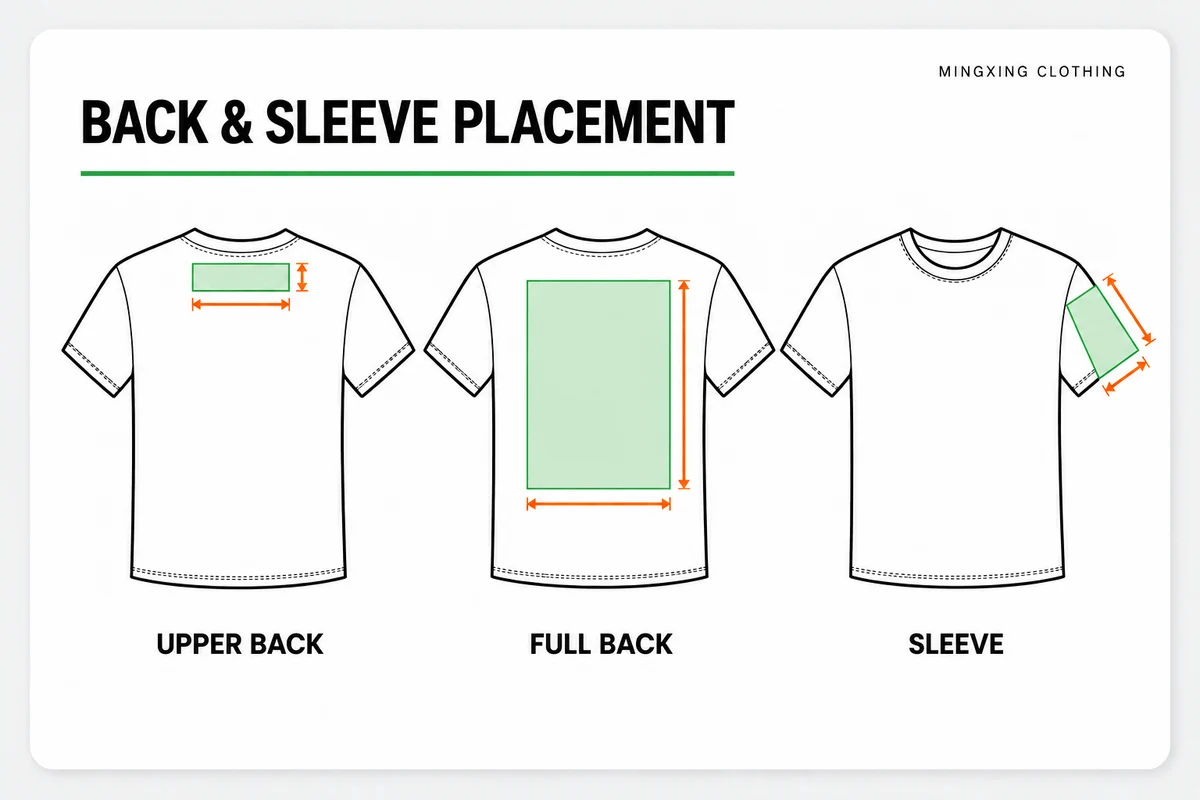
Upper-back or locker placement
This is a small centered design below the back neckline. It is useful for a secondary logo, event information or a brand mark paired with a larger front print. Check the collar clearance on the actual size because a thick rib collar, bound neckline or back-neck tape changes the visible space.
Full-back placement
A full-back print is often similar in width to a full-front print, but its vertical position should be approved independently. Place it in relation to the back collar and shoulder blades, then check total height. A very tall graphic may need to move upward or reduce in size to avoid the hem.
Across-shoulder placement
A wide, shallow graphic can sit across the upper back. The design must remain clear of the collar and armhole or raglan seams. When the art follows a curved shoulder line, a flat digital mockup may not predict the worn result, so approve it on a fitted sample.
Sleeve print placement
Sleeve prints need three directions: the distance from a stable point, the rotation around the arm and the relationship to the sleeve seam. “Print on the right sleeve” leaves all three open to interpretation.
- Short sleeve: mark the design center or top edge from the shoulder seam or sleeve hem, then show whether it faces forward, outward or backward when worn.
- Long sleeve: state the distance from the shoulder or cuff, plus the direction of any vertical text. Confirm that the design does not cross the underarm seam unless that is intentional and technically approved.
- Both sleeves: identify left and right from the wearer's point of view. Do not rely on a front-view mockup alone.
Large sleeve artwork may require a different platen, a transfer applied before sewing or another production sequence. Share the intended print method early through the customized craftsmanship process so placement and construction can be reviewed together.
Adjust placement for garment fit and size range
A placement approved on one standard T-shirt can look different on an oversized, boxy, cropped or fitted body. Use a real reference size and decide what should stay visually consistent across the range.
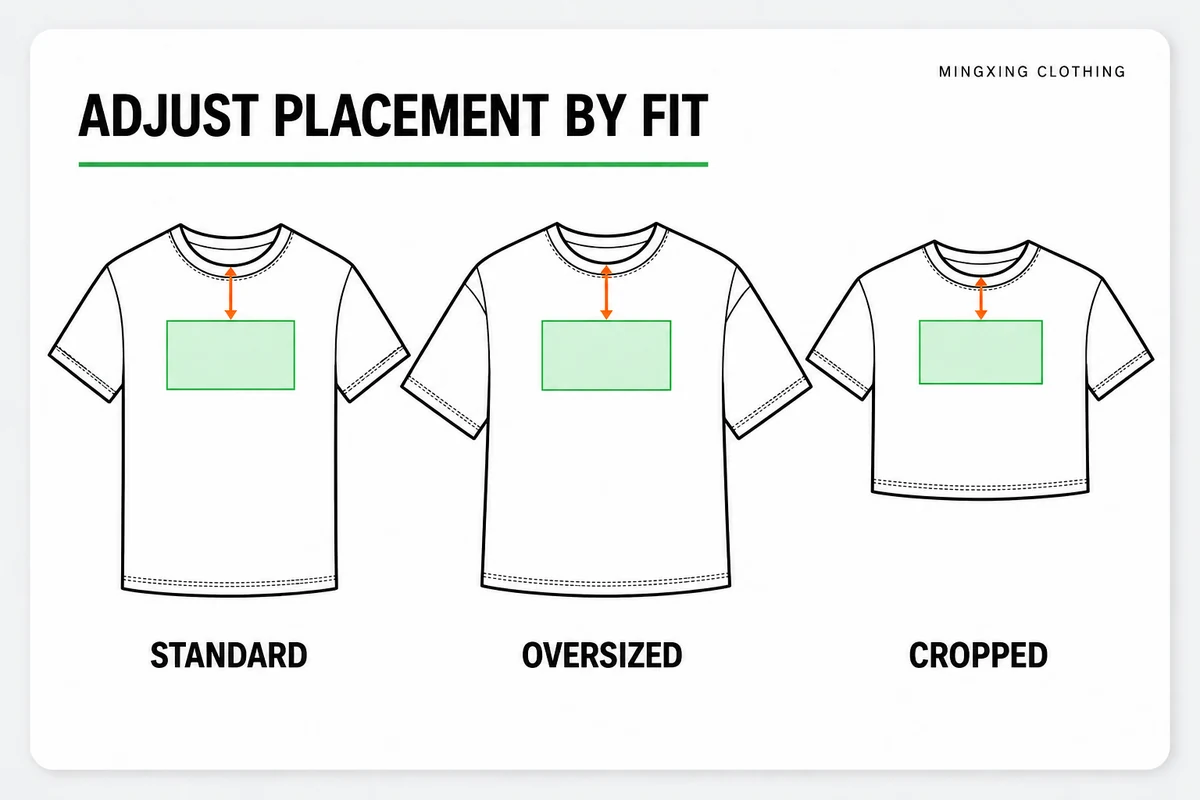
There are two common grading strategies. A fixed print size is simpler and preserves the same artwork dimensions, but its proportion changes across garment sizes. Grouped print sizes use separate artwork dimensions for smaller and larger garments, which can improve visual consistency but requires more files, screens or transfer sizes. Record the chosen size groups in the tech pack.
How the print method changes placement
The design area shown in a mockup is not automatically printable by every method. Fabric surface, heat, ink coverage, seam thickness and equipment access can all change the result.
For material choices that affect opacity, surface and drape, use the fabric guide for custom T-shirts before approving the decoration method.
How to write a placement specification
A clear placement sheet can be simple. Use the actual artwork name, mark the visible boundary and include enough measurements for another person to reproduce the location.
What to check on the print sample
Approve placement on the garment, not only on a digital mockup. Lay the sample flat for measurement, then review it on a body or form to judge visual balance. If the design or garment changes after approval, confirm whether a new sample or placement test is needed.
- The artwork file and version match the approved design.
- The finished width, height and orientation match the specification.
- The print is centered or offset as marked from the agreed reference points.
- Clearance from the collar, seams, pocket, zipper and hem is acceptable.
- The placement still looks balanced when the garment is worn.
- Small and large sizes follow the approved fixed or grouped artwork rule.
- Color, registration, edge detail, hand feel and surface are acceptable for the selected method.
- The result remains acceptable after any agreed wash or durability check.
If the artwork, garment measurements or size grading are still changing, use the product development process to resolve those inputs before final print approval.
Frequently asked questions
What is the standard size for a T-shirt front print?
There is no single standard that fits every garment and print method. For an adult unisex reference size, a full-front design often starts around 10–12 inches wide, while center-chest artwork is usually smaller. Confirm the final dimensions on the intended garment.
How large should a left chest logo be?
A common starting range is about 3–4 inches wide. The correct visual size depends on whether the artwork is square, round, tall or a wide wordmark. Position and approve the visible design boundary rather than empty space in the file.
How far below the collar should a print start?
A full-front print often begins about 2.5–3.5 inches below the front collar seam, and a full-back print often begins about 3–4 inches below the back collar seam. Collar shape, garment size, artwork height and fit can require a different offset.
Should the print size change across T-shirt sizes?
It can stay fixed or use grouped sizes. A fixed print is simpler but looks proportionally larger on small garments and smaller on large garments. Grouped print sizes can keep a more consistent visual proportion but require extra files and production setup.
Does the print method affect placement?
Yes. Screen printing, DTF, DTG, puff ink and embroidery have different equipment, surface and seam limitations. Confirm the method before locking the final size and location, then approve a sample on the actual fabric.